The real-world guide: dent types · DIY limits · PDR truth · what gets ruined by waiting
A customer walked into my shop last year holding a suction cup and a hairdryer, genuinely confused about why a parking lot crease the size of his forearm hadn’t popped out. He’d watched three YouTube videos. He’d boiled water. He’d tried the “compressed air trick.” What nobody told him — what no guide online seems to say plainly — is that once a dent has a crease in it, it has permanently stretched metal. No suction on earth pulls stretched metal back. That dent needed a technician, a proper set of picks, and a reflective light board. Instead, he’d wasted two hours and slightly worsened the damage. Knowing which dent you have before you touch it is the only thing that separates a $90 repair from a $600 respray.
Read the Dent First
Every guide online skips straight to methods. That’s backwards. The method you choose is entirely determined by the type of dent — and choosing wrong doesn’t just fail, it makes a professional repair harder and more expensive afterward. Here’s how I classify dents in the shop:
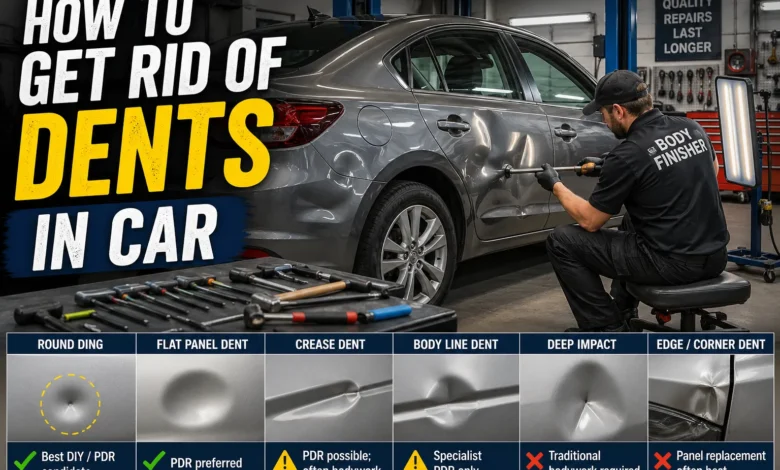
1. Round Ding
Smooth, circular, shallow. No crease, no paint damage. Classic door-ding or hail impact. Metal not stretched — just pushed.
✓ Best DIY / PDR candidate
2. Flat Panel Dent
Wide, shallow depression across a flat area (hood, roof, door skin). Paint intact. Common from a palm strike or light hail.
✓ PDR preferred
3. Crease Dent
Has a distinct line or ridge. Metal has stretched. Found on door edges and swage lines. The line means it was scraped or sharply struck.
⚠ PDR possible; often bodywork
4. Body Line Dent
Sits directly on a pressed crease in the panel (the “character line”). These require precise tool access and perfect metal memory.
⚠ Specialist PDR only
5. Deep Impact
Metal has significantly stretched outward, paint cracked or chipped. Often multi-layer damage. Requires filler and repaint regardless of method.
✗ Traditional bodywork required
6. Edge / Corner Dent
On or near panel flanges, wheel arches, or door edges. Tool access from behind is blocked. Metal folded, not pushed. Extremely difficult.
✗ Panel replacement often best
⚠ The Rule Before You Touch It
Run your finger over the dent. If you feel a sharp ridge, line, or fold — stop. That’s a crease. Any DIY pulling attempt stretches the metal further and destroys the “metal memory” that PDR technicians rely on. A PDR tech charges $150–250 for a clean round dent. They may refuse a butchered crease dent entirely, and you’ll be looking at a $500+ traditional repair. Assess before you act.
You might also like: How to Remove Scratches on Car Body
The Three Paths to Fixing a Dent
Before diving into methods, understand the landscape: there are exactly three routes to dent removal, and each serves a different dent profile. Most guides only properly cover one of them.
| DIY (Home Methods) |
|---|
| Round dings under 2 inches |
| Smooth, shallow profile |
| Paint completely intact |
| On flat or gently curved panels |
| Cost: $0 – $60 |
| Risk: Low to medium if done right |
| PDR (Paintless Dent Repair) |
|---|
| Most dents up to 4–5 inches |
| Hail damage (multiple dents) |
| Dents near body lines (specialist) |
| Paint intact or minimally cracked |
| Cost: $75 – $400 per panel |
| Risk: Zero — if paint is intact |
| Body Shop (Traditional Repair) |
|---|
| Crease dents with stretched metal |
| Paint cracked, chipped, or missing |
| Dents on edges and flanges |
| Deep impacts with structural concern |
| Cost: $300 – $1,500+ per panel |
| Risk: Color match, paint longevity |
DIY Dent Removal: What Actually Works
Online guides list 7–10 “methods” including boiling water, dry ice, magic erasers and vacuum cleaners. Let me be direct: most of those exist as content filler. Here’s an honest evaluation of each approach from someone who has seen what they do — and don’t do — to car panels.
1. Suction Cup / Plunger
✓ Works on: Round dings, flat panels, intact paint
The most practical DIY tool. A dedicated dent suction cup (not a toilet plunger — the surface area is wrong) works well on shallow, round dents on flat panels. Wet both surfaces before applying. Pull straight out — don’t lever sideways. Multiple slow pulls beat one aggressive yank.
What nobody mentions: The seal breaks on any surface with a curve steeper than about 20°. On a door with a strong crown, a plunger has almost no effective suction. It’s a tool for bonnets and door skin centers, not much else.
2. Glue Tab + Slide Hammer
✓ Works on: Medium round dents, areas with no rear access
This is the proper DIY step up from suction. A hot glue tab is bonded to the center of the dent; a slide hammer provides controlled, directional pull. More effective than suction alone because you can target the deepest point precisely. Kits cost $30–80 and are reusable.
Technique matters: Apply the glue tab to a dent that has been warmed with a heat gun for 60 seconds. Cold metal is stiffer and requires more force, which risks snapping the tab and leaving a raw patch. Always test-pull gently before committing force.
3. Hairdryer + Compressed Air
✓ Works on: Plastic bumpers, shallow dents in thin panels
Heat causes metal and plastic to expand; the rapid cold from upside-down compressed air causes contraction. On a plastic bumper, this genuinely works — thermoplastic (TPO) has good “memory” and will often pop back. On steel, the thermal differential is rarely large enough to move metal significantly.
What the guides won’t admit: This technique works about 30% of the time on steel panels, mostly on very shallow dents in thin gauge metal. It rarely works on doors (heavy gauge). If it doesn’t work first try, the second and third attempts give diminishing returns — the metal fatigues slightly each cycle.
4. Boiling Water (Bumpers Only)
✓ Works on: Plastic bumper covers only
Pour boiling water over a plastic bumper dent, reach behind and push. This works because plastic bumper covers are TPO — a thermoplastic that softens at around 160–200°F. The boiling water (212°F) is right in that range. This is a legitimate method for bumpers specifically.
Do not use on steel or aluminum. Water temperature cannot expand steel enough to move it back. You’ll saturate any exposed primer, encourage rust at the dent edge, and accomplish nothing. Every guide recommending this for metal panels is wrong.
5. Dent Pushing Rod (Through Access Hole)
✓ Works on: Most dents with rear panel access
For dents you can reach from behind — through interior trim panels, door wiring access holes, or by removing a light cluster — a blunt plastic or rubber-tipped rod applying slow, steady upward pressure is extremely effective. This is essentially amateur PDR. The key is lighting: set a lamp at a low angle across the panel to see the high and low spots. Work the edges of the dent inward, not the center first.
Center-first is the biggest DIY mistake. Pushing the center of a dent first locks the edges in place and creates a crown — a raised bump that’s harder to remove than the original dent was. Always work the perimeter toward the center in slow, small movements.
6. Dry Ice / Vacuum / Magic Eraser
✗ Not recommended on car body panels
Dry ice creates rapid thermal shock — but the differential on automotive steel is insufficient to move metal back into position. Any apparent result is usually the metal returning from heat expansion, not from the cold. The risk of paint cracking from thermal shock is real, especially on older or previously repainted panels. Vacuum “dent pullers” built from buckets provide inconsistent suction and no directional control — worse results than a dedicated suction cup.
The DIY Mistake That Costs You Professional Help
If you attempt a DIY repair on a dent and fail — even partially — a PDR technician may refuse to work on it. The metal memory is gone.
— Industry reality, rarely stated in guides
This is the single most important thing missing from every top search result on this topic, and it cost my customer a significant amount of money. PDR — paintless dent repair — works by using the metal’s own “memory”: the structural tendency to return to its original stamped shape when pressure is applied from the correct angle and location.
You might also like: Ceramic Coating Advantages
Body Shop Reality Check
When you pull incorrectly on a dent — wrong direction, wrong anchor point, too much force — you’re not just failing to fix it. You’re changing the stress pattern in the metal. A fresh door ding has clean, predictable tension lines radiating from the impact point. Those lines tell an experienced PDR tech exactly where to apply pressure and in what sequence. Distort those lines with a botched pull, and the tech is now working blind. Some will attempt it anyway and charge more. Others will simply decline.
The most damaging DIY attempts I see: hot glue left on too long (pulling paint when removed, especially in sun), slide hammer used with too much force creating multiple high-spots, and aggressive plunger use stretching a round dent into an oval with pressure-folded edges. One bad attempt converts a $150 PDR job into a $450 traditional repair with filler and respray. Always call a PDR tech for a free estimate before you try anything — most shops offer them at no charge.
PDR: The Honest Guide
Paintless dent repair is genuinely remarkable when applied to the right dent. But both the PDR industry and general guides oversell it. Here’s the complete picture.
When PDR Is the Right Call
-
Round or oval dents with smooth edges — the “pure push” category
-
Hail damage on flat panels (PDR handles this faster and cheaper than any alternative)
-
Door dings where paint is fully intact — even up to 3–4 inches
-
Dents that have existed for weeks or months — metal memory doesn’t expire on dents that weren’t creased
-
High-value vehicles where preserving the factory paint matters for resale
When PDR Will Fail or Isn’t Appropriate
-
Any dent with a visible crease or sharp fold — metal has stretched beyond elastic limit
-
Paint cracked, chipped, or flaking at the dent — once paint breaks, the repair needs refinishing regardless
-
Dents at panel edges, along hemmed flanges, or where two panels meet — tool access is physically impossible
-
Aluminum panels on some modern vehicles — aluminum has lower elasticity than steel and doesn’t respond to PDR as predictably; many PDR shops decline aluminum work
-
Ultra-high-strength steel (UHSS) areas — modern vehicles use boron steel in safety structures. This steel is above 600 MPa and is effectively immovable; forcing it risks cracking
-
Previously filled or repainted panels — aftermarket paint is thinner and less elastic than factory e-coat; it may crack or lift during PDR attempts
-
Any area where ADAS sensors are mounted — radar and camera sensors in bumper covers require precise geometry; reshaping the cover around a sensor zone risks affecting calibration
⚠ Modern Vehicle Warning
Vehicles built after roughly 2018 increasingly use mixed materials — aluminum doors, high-strength steel pillars, and plastic composite panels — sometimes on the same vehicle. Never assume the dented panel is steel. Check your owner’s manual or the sticker inside the door jamb for panel material. A PDR tech using steel tools on an aluminum door can cause permanent damage.
When It Goes to the Body Shop: What Actually Happens
Traditional dent repair is what happens when PDR isn’t an option. Understanding the process helps you ask better questions, spot quality work, and understand why it costs what it costs.
| 1 | Strip & Assess Panel is stripped to bare metal around the dent. This reveals whether the damage is just to the outer skin or has affected the inner structure. Inner structure damage means the panel may need to be replaced, not repaired — no filler can safely restore structural panel integrity. |
| 2 | Rough Metal Work A body hammer and dolly are used to work the metal as close to correct shape as possible before any filler goes on. The golden rule: filler is for feathering, not for filling. Filler over a deeply deformed panel will crack and separate. Metal work first, filler second. |
| 3 | Body Filler (Bondo) Mixed two-part polyester filler is applied in thin layers over the worked metal. Maximum filler thickness should be 6–8mm. More than that, and it becomes structurally unreliable — it may look perfect in the shop and crack within two years. If a tech is applying filler over a large area to avoid metal work, that’s a sign to find a different shop. |
| 4 | Block Sanding Filler is shaped with a long sanding block (not a small hand pad — that creates waves). The block bridges the high points and shaves them level with the surrounding panel. This is where skill matters most — a body finisher who rushes block sanding produces a panel that looks flat in the shop but shows a wave in direct sunlight. |
| 5 | Primer & Guide Coat High-build primer is applied and then a guide coat (a thin layer of contrasting color) is misted over. As you sand the primer, the guide coat reveals any low spots — areas where the guide coat remains show the surface is still uneven. Do not skip the guide coat. This is the quality-control step that separates good from great bodywork. |
| 6 | Spray, Blend & Clear Color is applied — and on a partial panel respray, it must be blended into adjacent panels. Blending is where most visible color mismatch occurs. A skilled painter feathers the color over a larger area than the repair; a poor painter stops sharply at the panel edge and the color difference is visible in raking light. |
What Dent Repairs Actually Cost
Most guides either avoid cost or give outdated averages. These are 2024–2025 realistic ranges for the UK, US, and Pakistan markets, based on shop-floor experience:
| Repair Type | Dent Size | USA (USD) | UK (GBP) | Method |
|---|---|---|---|---|
| Small Door Ding | Under 1 inch | $75–$150 | £50–£120 | PDR |
| Medium Round Dent | 1–3 inches | $150–$300 | £100–£220 | PDR |
| Large Flat Panel Dent | 3–6 inches | $250–$500 | £180–£380 | PDR or bodywork |
| Crease Dent (no paint damage) | Any | $350–$700 | £250–£500 | Traditional |
| Dent + Paint Damage | Any | $450–$900 | £300–£650 | Traditional + respray |
| Hail Damage (full car) | Multiple | $1.5K–$5K | £900–£3.5K | PDR (specialist) |
| Panel Replacement | Severe | 800–$2.5K | £600–£1.8K | New / used panel |
✅ Insurance Tip
PDR for hail damage is typically covered under comprehensive insurance without affecting your premium — because it’s a weather event, not an at-fault accident. Always request a PDR-specific estimate for hail damage before authorizing any traditional body shop work. The cost difference is substantial and insurers actively prefer PDR when it’s appropriate. Get the PDR tech in first.
What Happens If You Ignore a Dent
Almost no guide addresses what a dent does to a car over time if left alone. From ten years of watching cars come back into the shop, here’s what actually happens:
| Paint micro-cracking begins within weeks | on dents where the paint was stressed but not visibly cracked. The dent creates ongoing tension in the paint film. UV exposure and thermal cycling widen these micro-cracks until moisture penetrates. |
| Rust initiates within months | on any dent that has cracked, chipped, or even micro-fractured the paint down to primer or metal. Steel dents on the lower body — doors, sills, quarter panels — are especially vulnerable because water pools in the depression. |
| PDR window closes | on some dents over time. Crease dents that are left tend to work-harden at the fold — the metal becomes stiffer and less responsive to manipulation. What was a difficult PDR job at week one may be an impossible one at month six. |
| Insurance claim gets harder | if you wait. Adjusters can argue pre-existing damage if you report a dent weeks after it occurred. Photograph any new dent immediately — date and location metadata from your phone camera is legitimate documentation. |
| Resale value drops disproportionately | relative to repair cost. A $200 dent that you leave alone for a year typically knocks $500–800 off a private sale price because buyers visually anchor on visible damage and discount aggressively. |
Which Method For Your Dent: Quick Decision Guide
| Your Situation | Paint Intact? | Crease? | Rear Access? | Best Route |
|---|---|---|---|---|
| Small round door ding | Yes | No | Maybe | PDR or suction DIY |
| Large round dent, hood center | Yes | No | Yes | PDR — worth it |
| Parking lot door crease | Yes | Yes | No | Traditional body shop |
| Plastic bumper dent, no crack | Yes | No | Sometimes | Hot water + push method |
| Plastic bumper dent, paint cracked | No | Any | – | Respray required |
| Hail damage, multiple small dents | Yes | No | – | PDR specialist |
| Deep impact, metal compressed | No | Yes | – | Traditional — assess for structural |
| Dent on wheel arch lip / edge | Any | Yes | No | Panel replacement consideration |
| You already tried DIY and failed | Depends | Now maybe | – | Professional assessment — PDR may no longer be viable |
Frequently Asked Questions
Can a dent come back after it’s been repaired?
Yes, but only under specific conditions. A PDR repair on a round dent is effectively permanent — the metal returns to its original shape with no filler or adhesive involved. A traditional repair with body filler can telegraph over time if the filler was applied too thick, the metal prep was insufficient, or the panel flexes during temperature changes. Filler over 8mm thick is the most common cause of “ghost dents” reappearing on repainted panels 2–5 years later. Always ask how much filler a shop is using.
Will a dent I ignore get worse on its own?
Mechanically, the dent itself won’t deepen — but the paint situation around it will deteriorate. The stress at the dent perimeter continues to micro-fracture the paint film, especially on hot days when the body panel expands. What starts as a dent with intact paint will gradually develop paint lifting at the edges, then rust. On lower body panels in wet climates, this process can begin within three months. On rooftop dents on a garage-kept car, you may have years before it matters.
I pushed the dent out but now there’s a raised bump. What happened?
You pushed the center first and drove the edges inward, creating a crown — a raised area where the metal has nowhere to go. This is the classic outcome of center-first dent pushing. The fix: apply heat to the panel to relax the metal slightly, then use a knock-down tool (a plastic or rubber tipped flat-faced punch) and gentle taps to lower the high spot while using a pick from behind to keep the surrounding area level. This is fiddly work and usually benefits from a PDR tech’s light board to see the highs and lows accurately.
My car is older with some rust. Is it still worth repairing dents?
It depends on location and depth. A dent on a rust-free door panel of a 15-year-old car is still worth PDR if the paint is intact — the car’s age doesn’t affect the technique. However, if the dent is on a panel that already has rust underneath (common on sills, rear arches, and lower doors on older cars), the repair needs to address the rust first, or any body filler applied over it will lift within months. In that case, the repair cost may exceed the car’s value improvement — worth calculating honestly before proceeding.
Does fixing a dent affect my car’s resale value?
A quality repair — either PDR or professional bodywork — increases resale value more than the repair cost in most cases, especially on vehicles under 8 years old. The exception is a visible color mismatch or orange-peel texture from a poor respray, which can actually reduce buyer confidence more than the original dent would have. A paint thickness gauge is increasingly used by savvy private buyers to detect repainted panels — a PDR repair that preserves factory paint has no detectable signature and is unambiguously better for resale.
How do I find a reliable PDR technician?
Ask if they use a reflective light board or PDR bar — any legitimate PDR tech works with one. Ask to see before-and-after photos of similar dents. Be cautious of mobile PDR services that quote sight-unseen over the phone — good PDR techs assess in person because the size, depth, and location all matter. Hail damage specialists tend to be the most skilled PDR operators — they work at high volume and their livelihood depends on speed and quality. If you have hail damage, seek a shop that does it exclusively, not a general bodyshop offering PDR as a side service.
Disclaimer:
Written from 10 years of hands-on automotive body finishing experience. Cost figures are indicative ranges for 2024–2025 and will vary by region, vehicle type, and individual repair shop. Always obtain multiple quotes before proceeding with any body repair work.


I learned something new from this post.